
Configuring SSH Access on a Cisco ASA Firewall :-
In my previous article, i wrote about Configure SSH Server on Kali Linux and Setting up SSH on Cisco Router . Today i am going to show you How to configure a SSH access on Cisco ASA firewall. 🙂
Why Use Secure Shell (SSH)?
Secure Shell (SSH) improves network security by providing a means of establishing secure connections to networking devices for management, thereby preventing hackers from gaining access.
Using Digital Certificates, in a Public/Private Key Cryptography, SSH is able to authenticate clients or servers ensuring that the device or server you are about to connect to is exactly who they claim to be.
What About Telnet?
Like SSH, Telnet can also be used to connect to your server but, the main disadvantage of using Telnet is that it does not encrypt its connections. This means that if a hacker is able to capture packets from a Telnet session, he or she would be able to view information contained within those packets, such as a client’s username and password, therefore gaining access to your server .
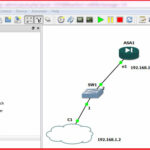
For this article, i am going to create a Topology on GNS3.
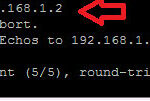
In this topology, i am going to assign 192.168.1.1 IP-address on inside Security level and my computer connected NIC IP is 192.168.1.2
Requirement for Configuring SSH access on Cisco ASA firewall :-
1. Hostname
2. Domain-Name
3. Crypto Key
4. Allowed Host for access Console
5. Authentication
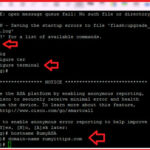
To configure hostname, use the command ciscoasa(config)#hostname yourfirewallname
To configure domain name, use the command ciscoasa9config)#domain-name yourfirewalldomainname
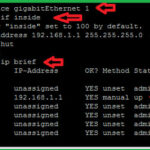
Now i am going to configure Inside interface.
As you seen in above topology, my PC is connected with interface eth1.
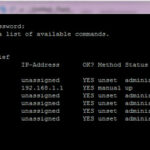
To configure interfaces, you have to define security level , IP-address. You can easily verify your IP-address configuration with #show interface ip brief command.
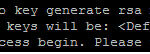
Now i am going to create a crypto key of 1024 size length.
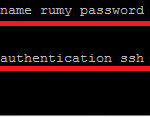
Now i am going to create a Username Rumy with Priviledge level 15 ( full access) and authenticate this user with local database,
 Now you need to allow your network to access SSH.
here, i want to allow all internal network for SSH access, so my command will be
rumyasa(config)# ssh 0 0 inside
Now ping the local network ip to check the connectivity.
Now you need a SSH client to access Cisco ASA, i am going to use Putty ( Download Now ) for it.
Open putty and enter your ASA ip-address and select the option SSH, First time it will give you Putty Security Alert, click on the yes to accept it.

Now enter your credentials, your SSH is working. 🙂
Hope you like my article.Configuring SSH Access on a Cisco ASA Firewall. Please share with others.
