

How to set up two-step verification for Evernote :-
EverNote is a comprehensive application that includes an intuitive working environment for managing notes, ideas, lists and events into one place. It comes in handy for personal and business purposes alike.
As a blogger, i am using evernote for my daily use to remember my notes. Today i am going to setup two-step authentication for Evernote. Presently you can only setup two-way authentication on evernote with Google Authenticator only. Means you need a Smartphone or Use Bluestacks on PC for this use.
Open Evernote, Go to the Help > Go to My Account Page option.

Now click on the Security option and click on the enable two-step authentication option. Now Evernote team will send you confirmation email with email confirmation code.

Now enter your code here and click on the continue.

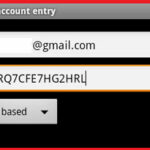
Now open your Google Authenticator App on your Smartphone or on BlueStacks and select manual account entry option.
Now enter your email ID and above mentioned key and select the Time based option.
Now it will create a one time password for your authentication.
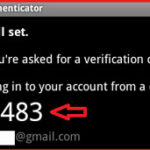
Now enter your code for your two-factor authentication. It will create a backup code for your backup. print it and save it.

now you need to be enter your backup code here for confirmation and click on the Continue.
Enjoy your two-step authentication on Evernote.
Also Check :- How to enable Two Step authentication in Twitter Account
Hope you like my post.How to set up two-step verification for Evernote . please Share with others.


