
 How to Prevent Dos attacks with WatchGuard XTM Firewall :-
DoS stand for denial of services. Main purpose of this attack is prevent the legitimate users to access the services. Most of the time Hackers are using Dos attack against government servers or popular sites for their political messages. in my previous article i wrote about How to Perform a DOS attack on Windows 7 , What is Smurf DOS Attack and How to do it with BackTrack 5R3 and How to Perform a DOS attack on a Website (LOIC Tool) .
WatchGuard is one of the leading network security organization that is providing Security solutions to secure your organization with their XTM devices.
Today i am going to show you How to Prevent Dos attacks with WatchGuard XTM Firewall ? used XTM device for this article is Firebox XTM 500 with active subscription services like IPS and Reputation enable defense.
1. Default Threat Protection :-
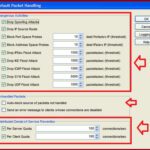
WatchGuard Firefox XTM device comes with basic threat protection like Drop Spoofing attacks , Block IP Source route packets , Block Port Space probs , Block Address space probs , IPSec flood attacks , IKE flood attacks , ICMP flood attacks , SYN Flood attack and UDP flood attack.
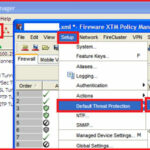
Open your WatchGuard System manger and click on the Policy Manager to open your policy configuration window.
Click on the Setup > Default Threat Protection and click on the Default Packet Handeling.
here you have the option to increase or decrease threshold values of each attack, You have also option to limit DDOS attack connections. better option is leave it as default.
2. Enabling IPS on your network :-
Intrusion prevention systems (IPS) are network security appliances that monitor network and/or system activities for malicious activity. The main functions of intrusion prevention systems are to identify malicious activity, log information about this activity, attempt to block/stop it, and report it.
in Fireware XTM v11.3.x and earlier, you can enable the IPS with Policy manager.
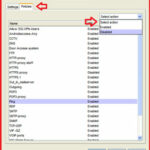
Open your Firefox XTM system manager > Navigate to Subscription Services > Select intrusion Prevention services from here.
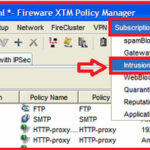
here, you have option to enable Intrusion prevention.
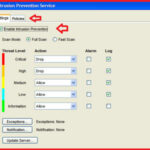
You have also option to enable or disable policy in the policies tab.
IPS in Fireware XTM v11.4.x and higher
In Fireware XTM v11.4.x and higher, IPS includes a new signature set with greater performance and efficiency. In Fireware XTM v11.4.x and higher., IPS is not restricted to only those ports and protocols used with proxies. You can also apply it to packet filter policies. In v11.4.x and higher, you configure IPS settings globally. The global IPS settings are applied to traffic on all ports by default. You can disable IPS at a per-policy level to meet your organizational needs, but it is important to understand that all policies for which IPS is enabled use the same IPS configuration. It is not possible to use a different IPS configuration for each policy.
Comparison of IPS Functionality
Both versions of IPS are signature-based subscription services that block threats to your network. But the signatures and configuration options are different for each version. The table below shows differences between IPS in Fireware XTM v11.4.x and higher and IPS in Fireware XTM v11.3.x and earlier.
| IPS in Fireware XTM v11.4.x and higher | IPS in Fireware XTM v11.3.x and earlier | |
|---|---|---|
| IPS configuration | Configure IPS settings globally, enable and disable IPS per policy. The global IPS configuration applies to all policies that have IPS enabled. * | Activate IPS with a wizard. Configure IPS settings per-policy. Each policy that has IPS enabled can have a different IPS configuration. |
| IPS in policies | IPS is automatically enabled for all policies. IPS scans traffic on all ports. | IPS can be configured for only the DNS, FTP, SMTP, HTTP, POP3, and TCP/UDP proxy policies. |
| Threat Levels | Five threat levels: Critical, High, Medium, Low, Information. | Numeric threat level from 1 to 100. 100 is the highest severity threat. |
| Where to see IPS signature information | In Firebox System Manager, on the Subscription Services tab, click Show to see information about each IPS signature. |
In the Fireware XTM Web UI, select Subscription Services > IPS, then select the Signatures tab to see information about each IPS signature.
Additional IPS signature information is published on the WatchGuard web site at:http://www.watchguard.com/SecurityPortal/ThreatDB.aspx. From this security portal, you can look up a signature ID. Click the signature ID to see links to additional information about the signatures, including CVE ID, Bugtraq ID, and other information, where available.In Firebox System Manager, on the Subscription Services tab, click Show to see information about each IPS signature.
The CVE identifier (CVE-ID) is shown in the signature list in Firebox System Manager for signatures that have an associated CVE identifier. For more information about signature severities and CVE identifiers in v11.3, seeIPS Signature Severities.
Signature information is not available in the Fireware XTM Web UI in v11.3.x.Signature exceptionsYou can configure IPS to allow, block, or drop traffic that matches each signature exception.IPS allows traffic that matches the signature exceptions.
* If you use HTTPS with DPI in Fireware XTM v11.7 and higher, IPS scanning is fully supported for by the HTTPS proxy, to enable the device to scan for IPS signatures on the decrypted HTTPS content stream. in Fireware XTM v11.4.x – v11.6.x, IPS scanning occurs before decryption of the HTTPS stream so IPS is not an effective tool for blocking possible intrusion attempts that pass through your XTM device as part of an encrypted HTTPS stream.
3. Enable Reputation Enable Defense :-
WatchGurad Reputation enable defense relies on a powerful, cloud-based web reputation service that aggregates data from multiple feeds, including industry-leading anti-virus engines, for real-time protection from web threats.
Traffic to URLs with a bad reputation will be blocked immediately, freeing up your box to do more important tasks instead of constant AV scanning. Tests show a reduction of up to 50% in antivirus processing.
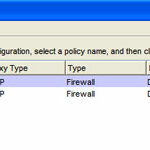
Navigate to Subscription services > Reputation enable defense in WatchGuard Policy Manager in WatchGuard System manager,
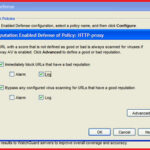
It will show you your configured proxy , click on the configure to configure reputation enable defense on particular policy.
here you have to check “ immediatly block URLs that have a bad reputation ” and ” Bypass any configured virus scanning for URLs that have good reputation ” .
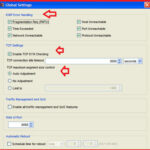
4. Managing Global Settings :-
WatchGuard XTM devices comes with the Global settings for ICMP error handling and TCP SYN checking.
Open your Fireware XTM policy manager and navigate to Setup > Global Settings.
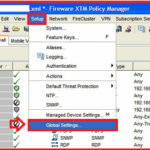
here you have the option to manage ICMP error handling , TCP SYN checking timeout and TCP maximum segment size control options.
Conclusion :- Personally i realize that Watchguard UTM devices dos attack prevention feature is good enough for small and medium organizations. 🙂
Hope you like my post.How to Prevent Dos attacks with WatchGuard XTM Firewall. Please share with others.
Also Check :-
Perform DDOS Attack with Hping Command
Configuring connection limit on Cisco ASA and CheckPoint Firewall
Find Out if Your Computer is Infected with a Bot


