


How to Create an Employee ID card Database in FileMaker Pro :-
ID card is one of most important identity for any organization. With identity card, management is able to identify the employee details. When i joined Al-Ghazzawi Group in Saudi Arabia they ask me to make id card for each employee. I Started to design the ID card with Photoshop, But the problem with photoshop you have to enter same field again and again, for example, You have to enter Name , Designation, nationality , Branch and Employee picture in each id. For 2-3 employee, Photoshop work is OK, but for making a ID card of a big group is really tedious work for me, then my one friend Chrish told me to use Filemaker pro to create a database of Employee. After creating database with Filemaker Pro, you have to enter only Employee Details, Name , Designation, Nationality and Branch field will be static. Believe me if you have layout of your ID card then within 1 hour, you are able to create employee id card of 500 employees. 🙂
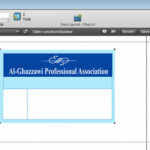
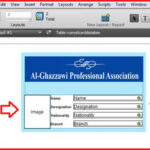
Below image is the layout that we designed for the Al-Ghazzawi professional Association on the Photoshop.

As you shown in the first image, you have to enter ID number , Name , Designation, Nationality, Branch and Image of employee. OK, lets start to create a database for employee ID card. 🙂
Open Filemaker Pro, Click on the File > New Database
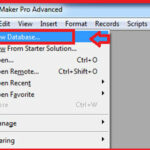
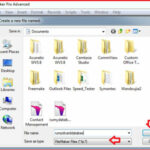
Put your desired database name and save it. make sure in Save as Type Filemaker files (*.fp7 ) selected.
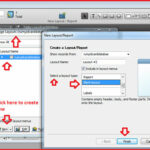
now we need to be define a layout for database, In this case we need to insert out Photoshop image, so i am going to use Blank layout.
Go to the File > Manage > Layouts or press the Ctrl + Shift + L to open Layouts. Now in the Manage Layouts , click on the New to create new layout and in Select a layout type, select Blank Layout and Click on the Finish.
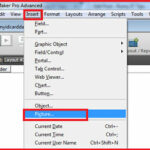
Your Layout is ready. Now you have to insert your image here. Click on the insert and select the image option and insert your image here.
now your database is ready to define the Fields.
Now in your ID-card database you have to define the fields for ID , Name, Designation, Nationality , Branch and Employee images.
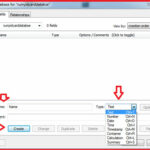
Now navigate to File > Manage > Database or Press Ctrl + Shift + D to open Database. navigate to Fields section, Enter the name of fields in the “Field name ” and in the Type field, you have to select type of field. Like for ID, Name , Designation, nationality , branch you have to enter the field name and select the Text type, because you have to enter text in your database.
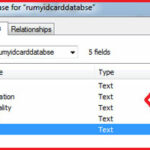
Here i create text field for Name , Designation , ID , nationality and branch.
For inserting image in your database, you have to create a field for image and in type section select the Container option.
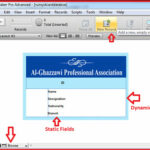
As you seen in below image, Fields are created with Lables, Means Name , Designation, Nationality and branch Word is static and and text fields are dynamic.

Now Drag and drop the fields on the image, as per your need.
As you seen i already enter the Name , Image , Designation , Nationality and branch field. and I left the ID field. here i want to show you How to enter Field in other way.
Press the Ctrl + Shift + D to open Database and create a one ID field with type text then navigate to Insert > Field and select the ID field and click OK. if you want to create label then select the option create label option. and Drag and drop on the position.

You have the option to manage font size and shape in the Format menu.
Now your Layout work Done, Save the layout and press the Ctrl + B to comes in the browse mode. As you seen in below image, You are in browse mode and ID , Name etc.. fields are static here.
Now your Employee ID card layout is ready to use. 🙂
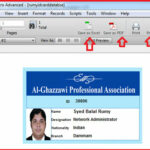
Click on the New Record option to enter Employee record. and enter your details here. To enter your image, Right-click on the image window and select the Insert image option here.

Now your Employee ID work is done. 🙂
But as you seen in below image, my id is ready but the image is not properly set the image window. 🙁

Nothing to worry about it. Again comes in the Layout mode with Ctrl + L and double-click on the Image window , it will open the Inspector properties option, navigate to Data tab and select the ” Reduce or enlarge image to fit ” option in the Data Formatting tab.

Now save the layout and comes in the browser mode.
Now can easily insert the new employee ID card data with New Record option ( Ctrl + N ).
Click on the preview option to see the preview your ID card and Save in PDF or Excel format or Setup the print here.
As you seen, Now you have complete database for your Employee ID card, now you are able to create unlimited number of ID for your organization employees without Photoshop, in less time.
For this article i just create some employee card within minutes.

You can easily print these ID with ID card-printer.


Enjoy these article and Show your skills to your management, How productive you are . 🙂
Personally i loves to work on FileMaker. Thanks my friend Chrish to teach me filemaker pro.
Hope you like my post.How to Create an Employee ID card Database in FileMaker Pro. Please Share with others.
How to create a DataBase in Filemaker Pro


