Best way to protect your Apache Web Server in your DMZ network :-
Apache is one of the most used Web-server to host your web files or your website on the web. Website security is always critical for any organization. However there is nothing 100 % secure in the digital world, but with hardening we are making our web-server less prone for hacking .
Today i am going to show you Best way to protect your Apache Web Server in your DMZ network with Firewalls .
Before you apply these changes in your web server, you should have some basics of the Apache server.
- Document root Directory: /var/www/html or /var/www
- Main Configuration file: /etc/httpd/conf/httpd.conf (RHEL/CentOS/Fedora) and/etc/apache/apache2.conf (Debian/Ubuntu).
- Default HTTP Port: 80 TCP
- Default HTTPS Port: 443 TCP
- Test your Configuration file settings and syntax: httpd -t
- Access Log files of Web Server: /var/log/httpd/access_log
- Error Log files of Web Server: /var/log/httpd/error_log
1. Hide Apache Version and OS Identity from Errors :-
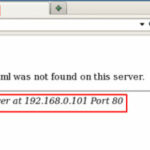
One of the first steps an attacker takes before attacking a website is to analyze the web server response in order to gather as much information as possible about it. This is known as “fingerprinting“.
Some headers in the HTTP response from the web server contain information that can be used by an attacker to identify the web server. The attacker can then launch an attack that exploits weaknesses in that particular web server.
Hide Apache Web-server information with Checkpoint GAIA :-
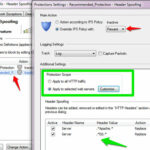
Checkpoint IPS module comes with a Web-server fingerpriting protection, To enable it navigate to IPS Software blade > Protections > By protocol > IPS software blade > Web Intelligence > Information gathering.
then double-click on it and select your protection profile , In Override IPS policy, choose prevent.
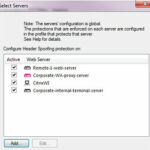
Click on the Customize option, if you want to apply for particular webserver
Hide Apache Web-server information with Cisco ASA :-
In Cisco ASA, you can easily spoof your web-server information by creating a one MPF policy for your DMZ zone.
rumyasa(config)# access-list HTTP permit tcp any any eq www
class-map HTTP
match access-l HTTP
policy-map type inspect HTTP_SPOOF
parameters
spoof-server “IIS (Windows)
policy-map HTTP
class HTTP
inspect http HTTP_SPOOF
service-policy HTTP interface outside
With above MPF policy, Hackers will receive your webrserver information as a IIS instead of Apache.
Hide Apache Web-server information with Symantec Endpoint Protection Manager (SEPM ) :-
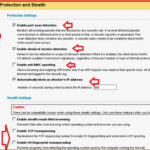
If you are protecting your web-server with SEPM, navigate to Policy > Firewall Policy > Protection and Stealth and enable the ” OS fingerprinting masquerdering ” option.
Hide Apache Web-Server information by Changing Configuration File :-
Open configuration file with vim editor and search for “ServerSignature“, its by default On. We need to Off these server signature and the second line “ServerTokens Prod” tells Apache to return only Apache as product in the server response header on the every page request, It suppress the OS, major and minor version info.
# vim /etc/httpd/conf/httpd.conf (RHEL/CentOS/Fedora)
# vim /etc/apache/apache2.conf (Debian/Ubuntu)
ServerSignature Off
ServerTokens Prod
# service httpd restart (RHEL/CentOS/Fedora)# service apache2 restart (Debian/Ubuntu)
2.Disable Directory Listing :-
If file access permissions on a web server are not properly defined, it could become possible to view a directory listing of the server. This can reveal confidential information which could be exploited by malicious users.
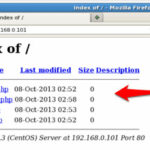
By default Apache list all the content of Document root directory in the absence of index file. Please see the image below.
We can turn off directory listing by using Options directive in configuration file for a specific directory. For that we need to make an entry in httpd.conf or apache2.conf file.
<Directory /var/www/html> Options -Indexes </Directory>
Disable Directory Listening with Checkpoint GAIA :-
Navigate to IPS Software blade > Protection > By Protocol > Web Intelligence > Information disclosure > Double-click on the Directory Listening and choose your protection profile and in Action menu select prevent.
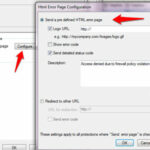
This protection identifies web pages containing directory listings and blocks them. When the attack is blocked, a customizable web page can be displayed.
To provide optimal detection sensitivity, three levels of protection are available: Low, Medium and High. The protection level can be selected for all HTTP traffic in the protection’s profile-specific settings, or it can be selected individually to each Web server through each server object’s Web Server > Protections page.
3. Keep updating Apache Regularly
Apache developer community is continuously working on security issues and releasing itsupdated version with new security options. So It is always recommended to use the latest versionof Apache as your web server.
To check Apache version: You can check your current version with httpd -v command.
# httpd -v
Server version: Apache/2.2.15 (Unix)
Server built:   Aug 13 2013 17:29:28
You can update your version with the following command.
# yum update httpd
# apt-get install apache2
It is also recommended to keep your Kernel and OS updated to the latest stable releases if you are not running any specific application which works only on specific OS or Kernel.
4. Protect against Buffer Overflow Vulnerabilities :-
Buffer overflow vulnerabilities in web servers and web applications are both common and dangerous.
By formatting special strings that contain assembler code, an attacker can create a memory corruption that can cause a server to crash or even run arbitrary code.
An attack exploiting a buffer overflow vulnerability does not require user interaction. This allows the attack to spread easily via reusable exploit scripts or worms.
Buffer overflow attacks can be performed using any space where user input is expected: URLs, HTTP headers, and HTTP bodies.
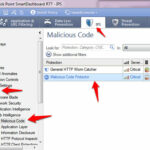
To provide Protection to your web-server with Checkpoint GAIA , Navigate to IPS software blade > Protections > By Protocol > Web intelligence > malicious code and enable the Malicious Code Protector Signature for your web-server.
5. Use Allow and Deny to Restrict access to Directories
We can restrict access to directories with “Allow” and “Deny” options in httpd.conf file. Here in this example, we’ll be securing root directory, for that by setting the following in the httpd.conffile.
<Directory />
   Options None
   Order deny,allow
   Deny from all
</Directory>
- Options “None” – This option will not allow users to enable any optional features.
- Order deny, allow – This is the order in which the “Deny” and “Allow” directives will be processed. Here it will “deny” first and “allow” next.
- Deny from all – This will deny request from everybody to the root directory, nobody will be able to access root directory.
6. Apache mod_cache DOS attack protection :-
Apache is a popular web server available for a wide variety of operating systems. The mod_cache module is one of the official plug-in modules for Apache.
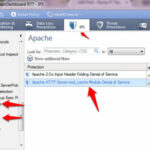
A denial of service vulnerability was reported in the mod_cache module of the Apache HTTP Server. An attacker may exploit this vulnerability to create a denial of service condition on an affected system.
7. Limit Request Size
By default Apache has no limit on the total size of the HTTP request i.e. unlimited and when you allow large requests on a web server its possible that you could be a victim of Denial of service attacks. We can Limit the requests size of an Apache directive “LimitRequestBody” with the directory tag.
You can set the value in bytes from 0 (unlimited) to 2147483647 (2GB) that are allowed in a request body. You can set this limit according to your site needs, Suppose you have a site where you allows uploads and you want to limit the upload size for a particular directory.
Here in this example, user_uploads is a directory which contains files uploaded by users. We are putting a limit of 500K for this.
<Directory "/var/www/myweb1/user_uploads">
   LimitRequestBody 5120
8. Use mod_security and mod_evasive Modules to Secure Apache :-
These two modules “mod_security” and “mod_evasive” are very popular modules of Apache in terms of security.
Mod_security
Where mod_security works as a firewall for our web applications and allows us to monitor trafficon a real time basis. It also helps us to protect our websites or web server from brute force attacks. You can simply install mod_security on your server with the help of your default package installers.
Install mod_security on Ubuntu/Debian
$ sudo apt-get install libapache2-mod-security
$ sudo a2enmod mod-security
$ sudo /etc/init.d/apache2 force-reload
Install mod_security on RHEL/CentOS/Fedora/
# yum install mod_security
# /etc/init.d/httpd restart
Mod_evasive
mod_evasive works very efficiently, it takes one request to process and processes it very well. It prevents DDOS attacks from doing as much damage. This feature of mod_evasive enables it to handle the HTTP brute force and Dos or DDos attack. This module detects attacks with three methods.
- If so many requests come to a same page in a few times per second.
- If any child process trying to make more than 50 concurrent requests.
- If any IP still trying to make new requests when its temporarily blacklisted.
mod_evasive can be installed directly from the source. Here, we have an Installation and setup guide of these modules which will help you to set up these Apache modules in your Linux box.
9. Protection against SQL Injection , Cross Site-Scripting :-
Check my article Secure your network for Most common Attacks with Checkpoint Firewall
10. Use Software /Hardware WAF :-
A web application firewall (WAF) is an appliance, server plugin, or filter that applies a set of rules to an HTTP conversation. Generally, these rules cover common attacks such as cross-site scripting (XSS) and SQL injection. By customizing the rules to your application, many attacks can be identified and blocked. The effort to perform this customization can be significant and needs to be maintained as the application is modified.
Hope you like my post.Best way to protect your Apache Web Server in your DMZ network. Please Share with others.

