

How to Deactivate a WordPress Plugin Using Cpanel File Manager :-
WordPress is one of the most used CMS ( content management system ) with tons of plugins. There is some situation like when your two plugins functionality conflicts and you are not able to login in your admin panel or suppose you have Google Authenticator enable for your admin login and you forget your phone then in this condition deactivating Google authenticator is good idea. 🙂
Same thing happened with me in last days. i installed OSE Firewall plugin on my WordPress site and after that i am not able to login on my admin panel because it consume my all server resource and i was getting the internal server error due to it,s higher CPU consumption.
Today i am going to show you How to Deactivate a WordPress Plugin Using Cpanel File Manager ?
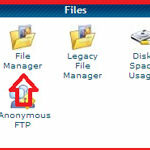
Log-in to your Cpanel account and navigate to File Manager.
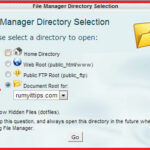
then select the Document Root for option and select your website here and click on the Go.
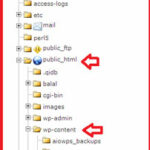
then navigate to / ( Root) > Public_HTML > WP-Content >Plugins
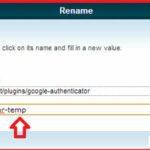
in the Right pane side you have all installed plugins. now select the plugins that you want to deactivate. Like in my case i just want to deactivate my Google Authenticator Plugin, so i choose the Google Authenticator plugin. right -click on the plugin and select the Rename option.
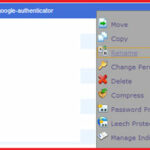
now you need to rename this plugin name, like in my case i just added the -temp word in plugin name to deactivate this plugin. and click on the Rename file option. it will deactivate your Google authenticator plugin.
Now you are able to login on your admin panel.
Now with your admin panel you are able to activate this plugins again or just rename the plugin name in File manager.
Also Check :-
How to Setup MaxCDN With WordPress W3 Total Cache Plugin
How to Find out What WordPress Theme a Site is Using
How to Secure your WordPress login page
Installing WordPress on Your Windows Desktop
How to add Google Analytics to WordPress
How to Improve the Security of your WordPress Blog
Get Google Verified Authorship for Your WordPress Blog
How to set up two-step verification for WordPress
How To Self Host Your Own Videos on WordPress


